When I showed you all my first stitchery on Wednesday, I had a couple of people ask questions (this is for you Donna and Beth and anyone else that has confidence in my instructions) about how to get the patterns on the material and where to get patterns, etc.. Well I'm very far from being any kind of expert, but I can tell you exactly what I did to get started (in very simple terms) lol!
First and foremost, for what I call my primitive stitchery information for dummies (which is what I needed), just
click here. Scroll down just a bit and you'll see articles for every step of stitching. And very helpful is a link there that shows videos of how to do stitches. I didn't have the slightest idea before. The stitchery I did contained 3 stitches...the backstitch (very common), the french knot, and the satin stitch. It is very simply explained and if you're like me, you can just hit play as many times as it takes until you think you've got it!
So first of all, you need to get you a pattern. If you're comfortable just drawing something on muslin or tracing something from a coloring book, you can do that. I ordered mine from
Primitive Stitches (which is the same site as the tips and techniques above). There is also a free one on the side bar to click on and receive when you make a purchase there. The following places were also suggested to me the other day as great places to find patterns:
Chestnut Junction (suggested by
Kimberly),
Cedarberry Stitches (suggested by
Julie) and then I also remember that
Twigs and Sprigs offers patterns as well (free ones too, I believe).

Gather the supplies that you will need. You probably won't be able to purchase your floss/thread until your pattern is in hand because you won't know the colors unless you're making up your own pattern and picking your own colors. But in the meanwhile, you'll need muslin (I purchased a yard), warm and natural (also in the fabric department). My warm and natural was cut from off a bolt but I'm told you can also get it in a bag. This goes behind the muslin for a quilted type look. Get you an embroidery hoop, your needle, scissors, and either a pencil or a mark be gone pen (it has disappearing ink). I saw this at Walmart, but I just decided to use a pencil after talking with the clerk there and it worked fine. Choose your floss/thread colors when you have your pattern.
Next you'll need to get your pattern to your muslin. It tells you in the tips and tricks at Primitive Stitches (under click here above) different ways to do this. The best way is to have a light box (which I think can be purchased from places like Hobby Lobby or Michaels), or tape your pattern to a well lit sunny window and tape your muslin over the top and trace it. Now I didn't even do that, I had a very well lit room with a bright light overhead and just taped my pattern to the table and taped the muslin down directly over it and pressed with my hand and I could see the pattern just fine. I then traced it completely with a sharp pencil. My stitches completely covered the pencil marks, so no problem with that.
Next just make sure you're familiar with the stitches (watch the videos above that I mentioned) and your pattern will tell you what type of stitch to use on various parts and sometimes will tell you how many strands of floss to use. I used 3 strands for everything on mine. Then start stitching. Make sure your muslin is on top and your warm and natural is right behind it and you stitch through both of them, so you'll want to cut the pieces into manageable sizes but leave it big enough to fit into your hoop and to work with framing afterwards.
After my stitching was done, I tea stained it by soaking tea bags in cold water for awhile and then dabbed the teabags directly over the completed stitchery in places that I wanted until I got a look I liked. You can also use coffee or coffee with cinnamon and/or vanilla. That makes it smell really good. I've used that before on lampshades. The tips above will tell you how to stain your muslin before and you can do it that way too.
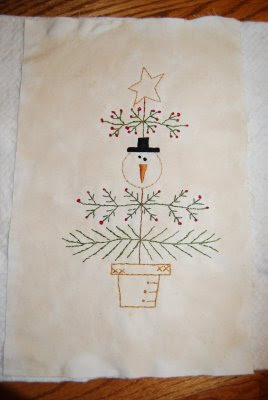
Then when you're all done you can just frame it directly to a frame size that fits or you can do like I'm doing mine and will show you tomorrow....I put homespun behind the stitching as a matted kind of look and I painted and distressed my frame. I'll show you a picture tomorrow as I'm waiting on my paint to dry on the frame. Some folks stitch their's onto a pillow (I don't have a sewing machine for the pillow), or you can stitch it onto a tea towel. Really there's so many things you can do with a stitchery!
So now if I can do it, come on and give it a try because I know you can too! Then you have to show it to me, okay? Good luck and have fun and let me know if I didn't make this clear as I'm typing this at almost 1:00 a.m. and scheduling it to post!
Happy Stitching!


